So, we are able to draw our nametables now, but we don’t have any color. This is, because are not using any palettes yet.
palettes
The palettes are the color codes, that our output is supposed to display. The NES has a fixed color palette of 64 colors.

//	NES color palette
uint32_t PALETTE[64] = {
		0x7C7C7C, 0x0000FC, 0x0000BC, 0x4428BC, 0x940084, 0xA80020, 0xA81000, 0x881400, 0x503000, 0x007800, 0x006800, 0x005800, 0x004058, 0x000000, 0x000000, 0x000000,
		0xBCBCBC, 0x0078F8, 0x0058F8, 0x6844FC, 0xD800CC, 0xE40058, 0xF83800, 0xE45C10, 0xAC7C00, 0x00B800, 0x00A800, 0x00A844, 0x008888, 0x000000, 0x000000, 0x000000,
		0xF8F8F8, 0x3CBCFC, 0x6888FC, 0x9878F8, 0xF878F8, 0xF85898, 0xF87858, 0xFCA044, 0xF8B800, 0xB8F818, 0x58D854, 0x58F898, 0x00E8D8, 0x787878, 0x000000, 0x000000,
		0xFCFCFC, 0xA4E4FC, 0xB8B8F8, 0xD8B8F8, 0xF8B8F8, 0xF8A4C0, 0xF0D0B0, 0xFCE0A8, 0xF8D878, 0xD8F878, 0xB8F8B8, 0xB8F8D8, 0x00FCFC, 0xF8D8F8, 0x000000, 0x000000
};
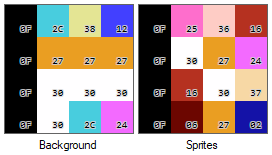
These colors can be indexed by the individual palettes for the background, and the sprites, so we can output the according color from the NES’s palette. The color indices from 0x00 up to 0x3f.
The individual palettes consists of only 3 colors each (which is logical, because, if we remember back, each sprite is encoded through 2 bits, giving us 4 possible values -> one of three colors, or transparent), and there are 4 individual palettes available for each the background, and sprites.
| Adress | Purpose |
| 0x3f00 | Universal background color |
| 0x3f01 – 0x3f03 | Background palette 0 |
| 0x3f05 – 0x3f07 | Background palette 1 |
| 0x3f09 – 0x3f0b | Background palette 2 |
| 0x3f0d – 0x3f0f | Background palette 3 |
| 0x3f11 – 0x3f13 | Sprite palette 0 |
| 0x3f15 – 0x3f17 | Sprite palette 1 |
| 0x3f19 – 0x3f1b | Sprite palette 2 |
| 0x3f1d – 0x3f1f | Sprite palette 3 |
attribute tables
So, for our pixels we need to know, which of the palettes we are supposed to use. This is what the attribute tables are for (as well).
The attribute tables are located at:
| Nametable 0 | 0x23c0 | 0x23ff |
| Nametable 1 | 0x27c0 | 0x27ff |
| Nametable 2 | 0x2bc0 | 0x2bff |
| Nametable 3 | 0x2fc0 | 0x2fff |
Each byte in the attribute tables represents the palette information for 2×2 tiles, so for 32×32 pixels.
,---+---+---+---.
|   |   |   |   |
+ D1-D0 + D3-D2 +
|   |   |   |   |
+---+---+---+---+
|   |   |   |   |
+ D5-D4 + D7-D6 +
|   |   |   |   |
`---+---+---+---'

7654 3210
|||| ||++- Color bits 3-2 for top left quadrant of this byte
|||| ++--- Color bits 3-2 for top right quadrant of this byte
||++------ Color bits 3-2 for bottom left quadrant of this byte
++-------- Color bits 3-2 for bottom right quadrant of this byte
Each two bits select which palette will be used for the tiles.
So, to draw our pixels with the according colors, we will have to check which attribute table entry applies for this pixel, get the palette from that entry, and then use our 2-bit pixel value (which we use for greyscale at the moment) to the select the appropriate color (of the 3 available colors in that particular palette).
The color index we get from the palette, we can use to get the actual color from the NES’s palette, to display the pixel in the actual color.
for (int r = 0; r < 960; r++) {
	for (int col = 0; col < 256; col++) {
		uint16_t tile_id = ((r / 8) * 32) + (col / 8);												//	sequential tile number
		uint16_t tile_nr = VRAM[0x2000 + (r / 8 * 32) + (col / 8)];									//	tile ID at the current address
		uint16_t adr = PPU_CTRL.background_pattern_table_adr_value + (tile_nr * 0x10) + (r % 8);	//	adress of the tile in CHR RAM

		//	select the correct byte of the attribute table
		uint16_t tile_attr_nr = VRAM[((0x2000 + (r / 8 * 32) + (col / 8)) & 0xfc00) + 0x03c0 + ((r / 32) * 8) + (col / 32)];
		//	select the part of the byte that we need (2-bits)
		uint16_t attr_shift = (((tile_id % 32) / 2 % 2) + (tile_id / 64 % 2) * 2) * 2;
		uint16_t palette_offset = ((tile_attr_nr >> attr_shift) & 0x3) * 4;
		uint8_t pixel = ((VRAM[adr] >> (7 - (col % 8))) & 1) + (((VRAM[adr + 8] >> (7 - (col % 8))) & 1) * 2);
		framebuffer[(r * 256 * 3) + (col * 3)] = (PALETTE[VRAM[0x3f00 + palette_offset + pixel]] >> 16) & 0xff;
		framebuffer[(r * 256 * 3) + (col * 3) + 1] = (PALETTE[VRAM[0x3f00 + palette_offset + pixel]] >> 8) & 0xff;
		framebuffer[(r * 256 * 3) + (col * 3) + 2] = (PALETTE[VRAM[0x3f00 + palette_offset + pixel]]) & 0xff;

	}
}
sprites
The information for sprites is stored in OAM. Each entry consists of 4 bytes, making it possible to store information for 64 sprites in OAM (256 bytes).
byte 0
Is the Y-Position of the sprite (top border). When drawing, you will need to add 1 to the position though, because the sprite data is delayed by 1 scanline.
byte 1
Is the index of the pattern table entry for this sprite. The pattern table is selected through PPUCTRL at 0x2000.
byte 2
This byte contains the attributes of this sprite.
76543210
||||||||
||||||++- Palette (4 to 7) of sprite
|||+++--- Unimplemented
||+------ Priority (0: in front of background; 1: behind background)
|+------- Flip sprite horizontally
+-------- Flip sprite vertically
byte 3
Is the X-Position of the sprite (left border).
Now, when we iterate through OAM, we can display the sprites according to their positions and attributes, with the right colors.
Note: When a pixel has the index 0, it is supposed to be transparent. Since we draw our sprites over the background, we basically just don't draw the pixel at all.
Now we can put our BG / NT and Sprite drawing together.
for (int i = 63; i >= 0; i--) {
uint8_t Y_Pos = OAM[i * 4];
uint8_t Tile_Index_Nr = OAM[i * 4 + 1];
uint8_t Attributes = OAM[i * 4 + 2];
uint8_t X_Pos = OAM[i * 4 + 3];
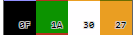
uint16_t Palette_Offset = 0x3f10 + ((Attributes & 3) * 4);
// iterate through 8x8 sprite in Pattern Table, with offset of Y_Pos and X_Pos
for (int j = 0; j < 8; j++) {
for (int t = 0; t < 8; t++) {
uint8_t V = 0x00;
switch ((Attributes >> 6) & 3) {
case 0x00: // no flip
V = ((VRAM[PPU_CTRL.sprite_pattern_table_adr_value + Tile_Index_Nr * 0x10 + j] >> (7 - (t % 8))) & 1) + ((VRAM[PPU_CTRL.sprite_pattern_table_adr_value + Tile_Index_Nr * 0x10 + j + 8] >> (7 - (t % 8))) & 1) * 2;
break;
case 0x01: // horizontal flip
V = ((VRAM[PPU_CTRL.sprite_pattern_table_adr_value + Tile_Index_Nr * 0x10 + j] >> (t % 8)) & 1) + ((VRAM[PPU_CTRL.sprite_pattern_table_adr_value + Tile_Index_Nr * 0x10 + j + 8] >> (t % 8)) & 1) * 2;
break;
case 0x02: // vertical flip
break;
case 0x03: // horizontal & vertical flip
break;
}
uint8_t R = (PALETTE[VRAM[Palette_Offset + V]] >> 16) & 0xff;
uint8_t G = (PALETTE[VRAM[Palette_Offset + V]] >> 8) & 0xff;
uint8_t B = PALETTE[VRAM[Palette_Offset + V]] & 0xff;
if (V) {
// when drawing "+1" is needed for the Y-Position, because sprite data is delayed by one scanline
framebuffer[((Y_Pos + 1 + j) * 256 * 3) + ((X_Pos + t) * 3)] = R;
framebuffer[((Y_Pos + 1 + j) * 256 * 3) + ((X_Pos + t) * 3) + 1] = G;
framebuffer[((Y_Pos + 1 + j) * 256 * 3) + ((X_Pos + t) * 3) + 2] = B;
}
}
}
}
If everything is put together, we can boot “Donkey Kong” again, and will be greeted with something like this:
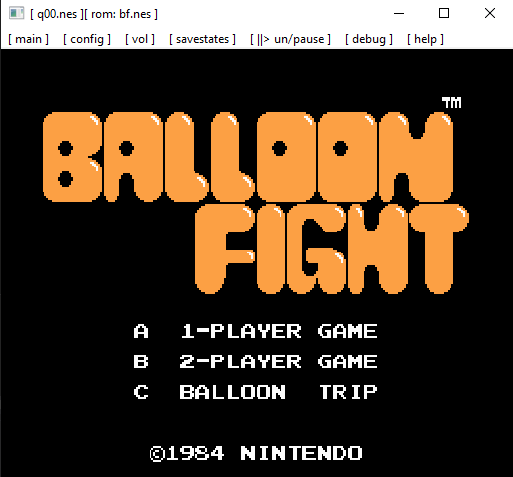
After making sure, that we are firing NMIs on VBlank, if it is enabled, we also can boot up “Balloon Fight“.
else if (ppuScanline == 241 && ppuCycles == 1) {	//	VBlank
	PPU_STATUS.setVBlank();
	if (PPU_CTRL.generate_nmi) {
		NMI_occured = true;
		NMI_output = true;
	}
	drawFrame();
}
Comments