It was time to add some nice features to our emulator, so it isn’t as bare as it is right now.
savestates
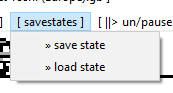
An absolute no-brainer for me was to add savestates. Who doesn’t know that feeling with a Gameboy, when the batteries died, or your mom called you for dinner, or you just sucked at Super Mario Land, and did not have enough lives to finish the game. With savestates it is always possible, to revert your game back to a state you saved before, no matter what game, or when you saved.
To accomplish this, all I had to do, was to serialize all of the registers, flags, and the complete memory from the point, the savestate was created. I added another menu for the savestates, a file-save dialog, and implemented the serialization of the data, before storing it binary to the disk as a file (with its own file format *.gbss even, because why not).
void saveState(char filename[], Registers& registers, Flags& flags, uint16_t pc, uint16_t sp ) {

	FILE* file = fopen(filename, "wb" );

	//	write memory
	fwrite(memory, sizeof(unsigned char), sizeof(memory), file);

	//	write registers
	unsigned char r[8] = {
		registers.A,
		registers.B,
		registers.C,
		registers.D,
		registers.E,
		registers.F,
		registers.H,
		registers.L
	};
	fwrite(r, sizeof(unsigned char), sizeof(r), file);

	//	write flags
	unsigned char f[4] = {
		flags.Z,
		flags.N,
		flags.H,
		flags.C
	};
	fwrite(f, sizeof(unsigned char), sizeof(f), file);

	//	write pointers
	uint16_t p[2] = {
		pc,
		sp
	};
	fwrite(p, sizeof(uint16_t), sizeof(p), file);

	fclose(file);

}
The savestate routine still is flawed, because it does not account for the memory banks that are possibly used, so you can actually end up with a messed up savestate, if you are unlucky. But adding MBC support to this, will be done in little to no time.
xbox / ps4 controller support
Wouldn’t it be awesome to play the most important handheld ever, with the most advanced gaming controllers that are on the market right now? That is, why I wanted to add support for Xbox and PS4 controllers.
Luckily, this was an easy task. SDL already offers complete support for game controllers and joysticks. So all I had to do, was to get the handle of the first game controller available to the host system, and OR it to our existing keyboard-control mapping.
//	use gamepad as input
if (controller != NULL) {
	bool Up = SDL_GameControllerGetButton(controller, SDL_CONTROLLER_BUTTON_DPAD_UP);
	bool Down = SDL_GameControllerGetButton(controller, SDL_CONTROLLER_BUTTON_DPAD_DOWN);
	bool Left = SDL_GameControllerGetButton(controller, SDL_CONTROLLER_BUTTON_DPAD_LEFT);
	bool Right = SDL_GameControllerGetButton(controller, SDL_CONTROLLER_BUTTON_DPAD_RIGHT);
	bool Back = SDL_GameControllerGetButton(controller, SDL_CONTROLLER_BUTTON_START);
	bool Start = SDL_GameControllerGetButton(controller, SDL_CONTROLLER_BUTTON_BACK);
	bool LeftShoulder = SDL_GameControllerGetButton(controller, SDL_CONTROLLER_BUTTON_LEFTSHOULDER);
	bool RightShoulder = SDL_GameControllerGetButton(controller, SDL_CONTROLLER_BUTTON_RIGHTSHOULDER);
	bool AButton = SDL_GameControllerGetButton(controller, SDL_CONTROLLER_BUTTON_A);
	bool BButton = SDL_GameControllerGetButton(controller, SDL_CONTROLLER_BUTTON_B);

	int16_t StickX = SDL_GameControllerGetAxis(controller, SDL_CONTROLLER_AXIS_LEFTX);
	int16_t StickY = SDL_GameControllerGetAxis(controller, SDL_CONTROLLER_AXIS_LEFTY);

	if ((val & 0x30) == 0x10) {
		joypad |= (AButton || keys[SDL_SCANCODE_A]) ? 0 : 1;
		joypad |= ((BButton || keys[SDL_SCANCODE_S]) ? 0 : 1) << 1;
		joypad |= ((Start || keys[SDL_SCANCODE_Z]) ? 0 : 1) << 2;
		joypad |= ((Back || keys[SDL_SCANCODE_X]) ? 0 : 1) << 3;
	}
	//	Joypad
	else if ((val & 0x30) == 0x20) {
		joypad |= (Right || keys[SDL_SCANCODE_RIGHT] || (StickX > 10000)) ? 0 : 1;
		joypad |= ((Left || keys[SDL_SCANCODE_LEFT] || (StickX < -10000)) ? 0 : 1) << 1;
		joypad |= ((Up || keys[SDL_SCANCODE_UP] || (StickY < -10000))? 0 : 1) << 2;
		joypad |= ((Down || keys[SDL_SCANCODE_DOWN] || (StickY > 10000))? 0 : 1) << 3;
	}
}
//	use keyboard only
else {
...
palettes
In order to give the user the chance to experience a graphical experience very close to the original Gameboy’s looks, or a very sharp black & white look (and even more than that), I implemented the selection of the color palette, that dictates the main 4 colors that are used in the PPU. So now the user can select, what look he prefers to play his retro games in.
misc
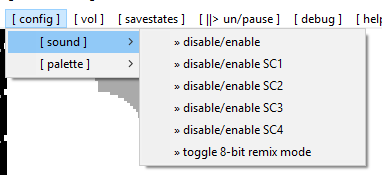
I also added the possibility, to disable the sound channels individually, and enable the remix-mode (if you happen to enjoy the modified tunes). Also, you can pause / resume the emulator with a click (or a simple press of the space bar), and regulate the output volume of the sound.
Comments