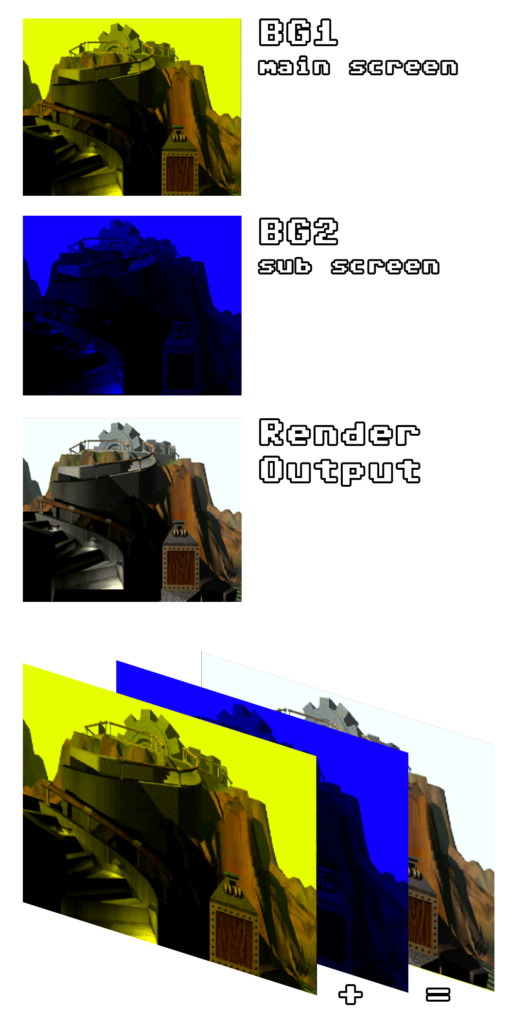
Another important step to conquer the SNES‘ complex graphics is to understand the concept of main screens and sub screens.
Every BG can be enabled for a main screen and/or for a sub screen. The main screens are the ones with already work with all the time and that are being blended together and rendered to the screen. Sub screens are only used for color math, so for image effects like translucency, shading etc.
Despite what they are set to, or not set to, main screens and their respective sub screens always hold the same data.
Main screens are enabled using the register 0x212C, the sub screens using the register 0x212D
| Bit | Description |
|---|---|
| Bit 0 | BG1 (0 – Disabled, 1 – Enabled) |
| Bit 1 | BG2 (0 – Disabled, 1 – Enabled) |
| Bit 2 | BG3 (0 – Disabled, 1 – Enabled) |
| Bit 3 | BG4 (0 – Disabled, 1 – Enabled) |
| Bit 4 | OBJ (0 – Disabled, 1 – Enabled) |
| Bit 5 – 7 | not used |
The general switch to enable Color Math is in bits 4 and 5 register 0x2130 (Color Math Control Register A)
| Bit | Description | Settings |
|---|---|---|
| Bit 0 | Direct Color | 0 – use palette, 1 – use direct color in 256 col mode |
| Bit 1 | Sub Screen BG/OBJ Enable | 0 – Backdrop only, 1 – Backdrop/BG/OBJ |
| Bit 2 – 3 | / | not used |
| Bit 4 – 5 | Enable Color Math | 0 – always, 1 – MathWindow, 2 – NotMathWindow, 3 – never |
| Bit 6 – 7 | Force Main Screen Black | 0 – never, 1 – NotMathWindow, 2 – MathWindow, 3 – alway |
Additionally, the Backgrounds have to be enabled for Color Math in the additional register 0x2131 (Color Math Control Register B)
| Bit | Description | Settings |
|---|---|---|
| Bit 0 | Color Math for BG1 | 0 – disabled, 1 – enabled |
| Bit 1 | Color Math for BG2 | 0 – disabled, 1 – enabled |
| Bit 2 | Color Math for BG3 | 0 – disabled, 1 – enabled |
| Bit 3 | Color Math for BG4 | 0 – disabled, 1 – enabled |
| Bit 4 | Color Math for OBJ/Palette 4 – 7 | 0 – disabled, 1 – enabled |
| Bit 5 | Color Math for Backdrop | 0 – disabled, 1 – enabled |
| Bit 6 | Div2 | 0 – no division, 1 – divide result by 2 |
| Bit 7 | Add/Sub mode | 0 – add, 1 – subtract |
With Bit 7 we can select if the sub screens are supposed to added or subtracted from the main screens, which is what ultimately creates the image effects. Bit 6 can optionally dictate to divide the result 2, so the effect is not that ‘hard’.
Color Math can be disabled by setting Bits 4-5 of 0x2130, or by clearing Bits 0-5 of 0x2131.
When it is disabled, only the Main Screen is displayed, and the Sub Screen has no effect on the display.
The actual additions and subtractions to the main screens are simple additions and subtractions, per color channel, clamped to 0, respectively 255. For the addition, SDL luckily already offers a blend mode, so it’s not much that we have to do:
// example for a single BG
SDL_BlendMode COLOR_MATH_REG_B_ADD_SUB = SDL_BLENDMODE_ADD;
...
if (BG_ENABLED[0]) {
	SDL_RenderCopy(renderer, TEXTURE[0], NULL, NULL);
	//	SubScreens
	if (COLOR_MATH_REG_A_COLOR_MATH_ENABLE == 0) {
		if (SUB_ENABLED[3] && SUB_COLMATH_ENABLED[0]) {
			SDL_SetTextureBlendMode(TEXTURE[3], COLOR_MATH_REG_B_ADD_SUB);
			SDL_RenderCopy(renderer, TEXTURE[3], NULL, NULL);
		}
		if (SUB_ENABLED[2] && SUB_COLMATH_ENABLED[0]) {
			SDL_SetTextureBlendMode(TEXTURE[2], COLOR_MATH_REG_B_ADD_SUB);
			SDL_RenderCopy(renderer, TEXTURE[2], NULL, NULL);
		}
		if (SUB_ENABLED[1] && SUB_COLMATH_ENABLED[0]) {
			SDL_SetTextureBlendMode(TEXTURE[1], COLOR_MATH_REG_B_ADD_SUB);
			SDL_RenderCopy(renderer, TEXTURE[1], NULL, NULL);
		}
		if (SUB_ENABLED[0] && SUB_COLMATH_ENABLED[0]) {
			SDL_SetTextureBlendMode(TEXTURE[0], COLOR_MATH_REG_B_ADD_SUB);
			SDL_RenderCopy(renderer, TEXTURE[0], NULL, NULL);
		}
	}
}
We are lacking the subtraction blend mode though. But SDL offers us the ability to create custom blend modes, which is a very handy tool for us now, because we can create a static blend mode that we can use for the rest of the code.
const SDL_BlendMode SDL_BLENDMODE_SUB = SDL_ComposeCustomBlendMode(SDL_BLENDFACTOR_SRC_ALPHA, SDL_BLENDFACTOR_ONE, SDL_BLENDOPERATION_REV_SUBTRACT, SDL_BLENDFACTOR_ZERO, SDL_BLENDFACTOR_ONE, SDL_BLENDOPERATION_ADD);
To actually test our blending and our first steps in color math, we run (of course) more tests from krom.

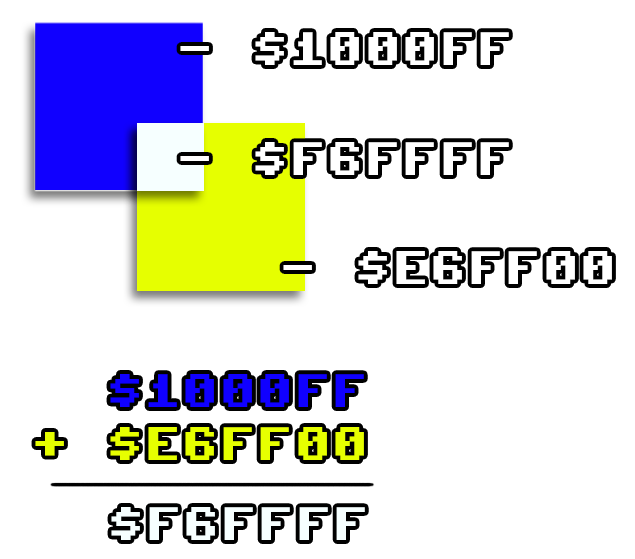
This is, like already explained, done by the simple additional blending, which is nothing but adding color per channel. For example if we look at the sky in that images, the following happens:

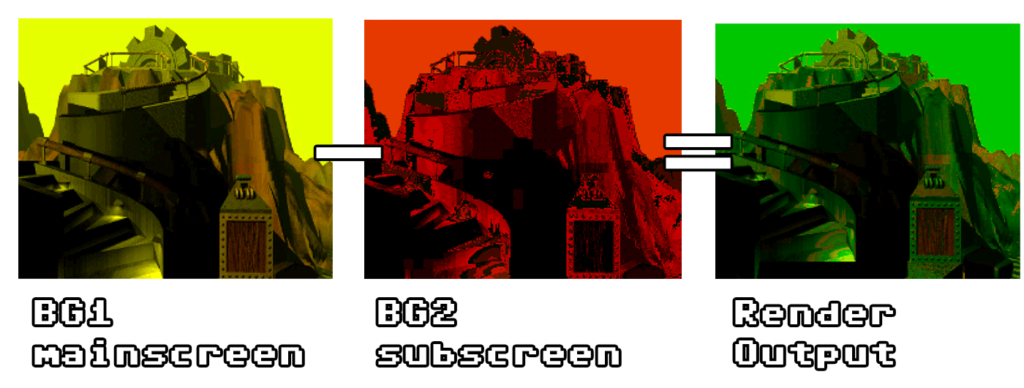
The same happens for the subtraction we implemented (just being clamped down to 0x00 instead of 0xFF per channel). But since krom’s test are only working with add, I modified the source code of the test(s), to use subtract instead. The palettes are created with adding in mind though, so I changed the palette of the sub screen as well, so we can cleary see some changes in the end result. The result is not pretty, but we only need to be able to verify it’s correct in comparison to hardware (or other emulators).

After we verified that subtracting works just as well, we can run the other 2 test as well, to confirm everything works as intended.


Comments