Now, it’s time to implement our PPU (pixel processing unit), to be able to finally display something. For this, I chose SDL, as it is a cross-platform library, which makes porting very easy, and is very well tested (even though we will experience SDL bugs later on in this project). For the time being, I chose SDL 2.0.9, as it was the most recent release available.
In the Init function of our PPU, we need to initialize SDL, set our resolution dimensions, and create textures, that we can write to, that will be displayed in our renderer.
void initPPU() {

    SDL_Renderer* renderer;
    SDL_Window* window;
    SDL_Texture* texture;

	//	init and create window and renderer
	SDL_Init(SDL_INIT_VIDEO);
	SDL_SetHint(SDL_HINT_RENDER_VSYNC, "1");
	SDL_CreateWindowAndRenderer(160, 144, 0, &window, &renderer);
	SDL_SetWindowSize(window, 480, 432);
	SDL_SetWindowResizable(window, SDL_TRUE);
The last line only allows the user, to freely resize the window
So, the Gameboy’s screen has the dimensions of 160px * 144px. With these dimensions, we can calculate the size of our framebuffer array that we need. We will work with RGB24 and RGBA24 color coding. This way, we will have 3 bytes per pixel for the color (and additionally another byte with RGBA24, for alpha / opacity).
unsigned char framebuffer[160 * 144 * 3];	//	3 bytes per pixel, RGB24
unsigned char framebufferA[160 * 144 * 4];	//	4 bytes per pixel, RGBA24
The framebuffer with additional alpha is necessary, to be able to draw multiple framebuffers on top of each other. This is needed, because the Gameboy draws multiple layers. On the ground, there is the BG-Layer, above that there is the Window-Layer, and the last layer is the Sprite-Layer.
Everything you can see on the screen, is based of tiles. Either 8×8 or 8×16 tiles. For the background, and the window layer, there are two memory ranges that hold data of sprites, and another two memory ranges, that actually dictate which sprites have to be loaded.
So, as we will start to implement our BG-Layer, we will need to identify the currently wanted memory ranges for the tiles. This is dictated by bits 3 and 4 on memory address 0xFF40.
tilemap = (((memory[0xff40] >> 3) & 1) == 1) ? 0x9c00 : 0x9800;
tiledata = (((memory[0xff40] >> 4) & 1) == 1) ? 0x8000 : 0x8800;
The only, very important difference between the two tiledata ranges that are selectable, is that the range from 0x8800 read the tiles signed, so tile 0 is actually at 0x9000, and the tile-IDs can go 256 above, and 255 below that address.
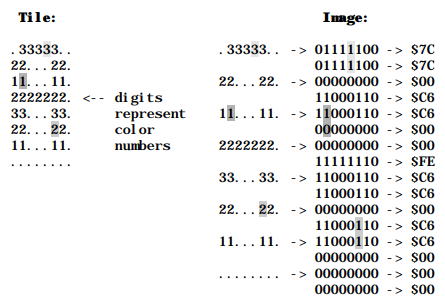
So, we will read out the tileIDs at the tileMap, and then read the actual graphic at tileData, identified by the tileID. The graphic data will then go into our BG-array, pixel per pixel, in RGB format.
Important!
The Layer-dependent arrays are of bigger size than our main framebuffer. To be more precise, it is 256 * 256 * 3/4 of size.
The VRAM is 256x256 pixels wide, and we need 3 bytes (or 4 bytes, if alpha channel is used) for each pixel.
//	get real color from palette
colorfrompal = (p >> (2 * colorval)) & 3;
bgmapA[(row * 256 * 4) + (j * 4)] = COLORS[colorfrompal * 3];
bgmapA[(row * 256 * 4) + (j * 4) + 1] = COLORS[colorfrompal * 3 + 1];
bgmapA[(row * 256 * 4) + (j * 4) + 2] = COLORS[colorfrompal * 3 + 2];
bgmapA[(row * 256 * 4) + (j * 4) + 3] = 0xff;
colorval is the actual value of the currently read pixel (value 0-4)
COLORS[] is an actual palette of colors, that I set up, to display tones of grey, or maybe green, whatever the user prefers
The actual colorval reads the graphics data. Each line of (8-bit wide) pixels is encoded in 2 Bytes. This allows for each pixel to have 4 different values (2-bits per pixel)
The BG-framebuffer then is copied to the main framebuffer. This is necessary, because later on, we have to add the Window-Layer, and the Sprite-Layer on top.
void drawFrame() {
	//	print by line, so image effects are possible
	for (int r = 0; r < 144; r++) {
		for (int col = 0; col < 160; col++) {
			yoffA = (r * 256 * 4);
			xoffA = (col * 4);
			framebufferA[(r * 160 * 4) + (col * 4)] = bgmapA[yoffA + xoffA];
			framebufferA[(r * 160 * 4) + (col * 4) + 1] = bgmapA[yoffA + xoffA + 1];
			framebufferA[(r * 160 * 4) + (col * 4) + 2] = bgmapA[yoffA + xoffA + 2];
			framebufferA[(r * 160 * 4) + (col * 4) + 3] = bgmapA[yoffA + xoffA + 3];
...
    SDL_UpdateTexture(textureA, NULL, framebufferA, 160 * sizeof(unsigned char) * 4);
	SDL_RenderCopy(renderer, textureA, NULL, NULL);
	SDL_RenderPresent(renderer);
At the end of our drawFrame() function, we actually tell SDL to draw our framebuffer to our texture, and render this texture with our renderer. This way, we are finally able to display something.
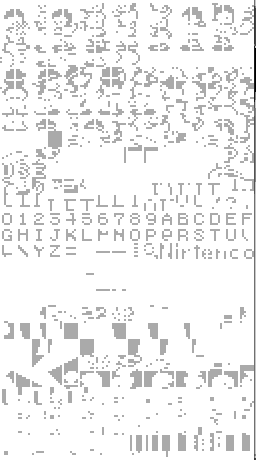
Running the Gameboy’s boot-ROM, we should now be able, to see something on start-up:
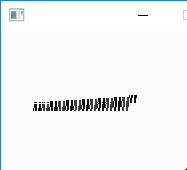
This was the first output I ever had on my PPU. As you can see, the general outline could fit the Nintendo-Logo and the Trademark-R, but the actual data is scrambled. It turned out to be my ROT ops were not correct. Instead of actually rotating, I was only shifting them.
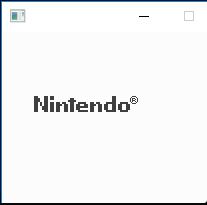
After fixing my rotation ops, I was able to finally get a proper output. Note, that what you are seeing, is the first 160x144px of VRAM. As earlier mentioned, VRAM (for each layer) is 256x256px big. So, currently we are only seeing the upper left viewport of VRAM right now. This viewport will be used for scrolling with the according offsets for X and Y (SCX and SCY).
For now, we only have a static Nintendo-Logo. This is because we didn’t implement the scrolling of our viewport yet. It’s not the Nintendo-Logo that scrolls, but the viewport.
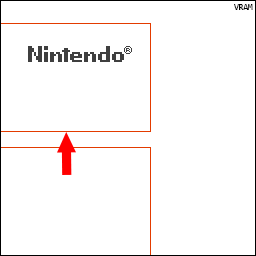
The scrolling values SCX (0xFF43) and SCY (0xFF42) can now be used, to offset the viewport, and to simulate the scrolling effect of the Nintendo logo.
Note: When reaching any end on the VRAM, the viewport will wrap around the edge!
void calcBG(uint8_t row) {

	//	reset SCY, SCX for correct scrolling values
	SCY = readFromMem(0xff42);
	SCX = readFromMem(0xff43);

	tilemap = (((readFromMem(0xff40) >> 3) & 1) == 1) ? 0x9c00 : 0x9800;		//	check which location was set in LCDC for BG Map
	tiledata = (((readFromMem(0xff40) >> 4) & 1) == 1) ? 0x8000 : 0x8800;		//	check which location was set in LCDC for BG / Window Tile Data (Catalog)
	unsigned char p = readFromMem(0xff47);
	for (int j = 0; j < 256; j++) {

		//	handle wrapping
		uint8_t offY = row + SCY;
		uint8_t offX = j + SCX;

		//	which tile no. is wanted from tiledata
		tilenr = readFromMem(tilemap + ((offY / 8 * 32) + (offX / 8)));
		//	get color value for the current pixel (00, 01, 10, 11)
		//	if 0x8800 we adress as signed tilenr from 0x9000 being tile 0 (overwrite the original value)
		if (tiledata == 0x8800) {
			colorval = (readFromMem(tiledata + 0x800 + ((int8_t)tilenr * 0x10) + (offY % 8 * 2)) >> (7 - (offX % 8)) & 0x1) + ((readFromMem(tiledata + 0x800 + ((int8_t)tilenr * 0x10) + (offY % 8 * 2) + 1) >> (7 - (offX % 8)) & 0x1) * 2);
		}
		else {
			colorval = (readFromMem(tiledata + (tilenr * 0x10) + (offY % 8 * 2)) >> (7 - (offX % 8)) & 0x1) + (readFromMem(tiledata + (tilenr * 0x10) + (offY % 8 * 2) + 1) >> (7 - (offX % 8)) & 0x1) * 2;
		}

		//	get real color from palette
		colorfrompal = (p >> (2 * colorval)) & 3;
		bgmapA[(row * 256 * 4) + (j * 4)] = COLORS[colorfrompal * 3];
		bgmapA[(row * 256 * 4) + (j * 4) + 1] = COLORS[colorfrompal * 3 + 1];
		bgmapA[(row * 256 * 4) + (j * 4) + 2] = COLORS[colorfrompal * 3 + 2];
		bgmapA[(row * 256 * 4) + (j * 4) + 3] = 0xff;

	}
}
The completed PPU function to calculate the BG. The readFromMem(adr) is just reading from the memory, and will be explained later in the MMU documentation.
If implemented correctly, you will end up with the actual Nintendo logo scrolling as you would expect it:
Wait, you don’t? The logo still doesn’t move at all? Well, it does, the emulator just is running way too fast.
Comments